Technical Developer Guide
Axis Alignment
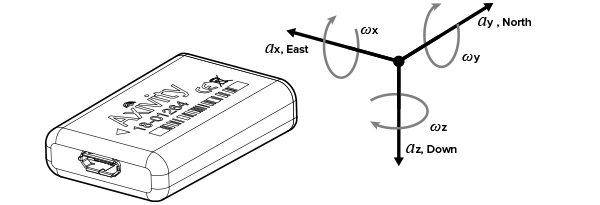
The following illustration indicates the orientation of the accelerometer, gyro and magnetometer axis. When mounting the device or processing data collected by the device, a note of the sensor orientation should be noted and if multiple data sets are being gathered, the data collection protocol should include a device orientation.
Data Conversion
All sensors have a digital output which can be converted into SI units using simple transforms. This section summarises these transforms.
Battery
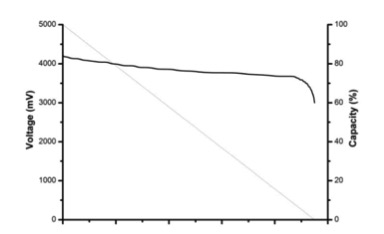
The battery output is in millivolts and the battery used is a lithium polymer type. The fully charged voltage of lithium polymer cells at 25 ̊C is 4.2 V or 4200 mV. The discharge curve of lithium batteries is non-linear and it is not possible to linearly approximate the percentage of capacity remaining. After 3300 mV the battery is nearly depleted (see figure below) and the voltage will drop rapidly, this could result in a device reset and an unexpected loss of communication; by this point the user should be recharging the device.
Temperature
The temperature sensor is sampled every second and is expresses as a signed 16bit integer in 0.1 ̊C steps; Divide by 10 to convert to Celsius (SI unit).
Barometric Pressure
The pressure is expressed as a signed 32bit integer in Pascal’s (SI unit). Conversion from Pascal’s to altitude is a complicated process involving thermodynamic and physical models to account for the changes in density and pressure through the atmosphere. However, a simple conversion can be accomplished assuming typical conditions to reasonably accurately determine a change in altitude from a given reference point at which the pressure is known ($P_0$). The conversion is explained here and can be summarised as: $$\delta_h \approx K.ln\frac{P}{P_0}$$ where $\delta_h$ is the change in height, $P$ is the pressure in Pascal’s and $P_0$ is the pressure at the origin (e.g. Sea level). $$K = -\frac{RT_0}{gM}$$ where $R$ is the universal gas constant, $T_0$ is origins temperature, $g$ is gravity and $M$ is the molar mass of air (all SI units). Typically $K$ ≃ -8434.6678. Since there is an approximate exponential relationship at moderate altitudes, a simple exponential function can be used as described on page 16 of the barometric pressure sensors datasheet. This approximation uses the faster pow(x,y) function from the standard C library math.h and can be implemented to yield the height in cm using the following example.
#include <math.h>

long CalculateAltitudeCm(long pressure, long pressure_sea_level)
{
    long altitude = 0;

    float temp1,temp2;

    temp1 = ((float)pressure)/((float)pressure_sea_level);

    temp2 = powf(temp1,0.19029495718363462); /*double*/

    temp1 = (float)4433000*(1-temp2); /*note extra zeros are for cm*/   altitude = ((temp1 >= 0)?(long)(temp1+0.5):(long)(temp1-0.5));
    return altitude;
}
Accelerometer
The accelerometer output is expressed as three signed 16bit integers. The sensor measures linear acceleration in each of three axis. The accelerometer resolution is 14 bits and is left justified in all resolution modes, this makes the last two bits of the sensor output always zero. The range setting of the accelerometer determines the scaling factor required to convert the integer to standard units as described in the following table.
| Range setting | Convert to g | Dynamic range |
|---|---|---|
| 2 | divide by 16384 | ± 2g |
| 4 | divide by 8192 | ± 4g |
| 8 | divide by 4096 | ± 8g |
Gyroscope
The gyroscope sensor output is expressed as three signed 16bit integers in the order x, y, z. The orientation of the sensor axis is the same as the accelerometer (see previous section). The output of the gyroscope is proportional to the angular velocity around each or the axis and is usually described in degrees per second (dps). The conversion to dps depends upon the range setting of the sensor as summarised below:
| Range setting | Convert to dps | Dynamic range |
|---|---|---|
| 250 | multiply by 0.00875 | ± 250 dps |
| 500 | multiply by 0.01750 | ± 500 dps |
| 2000 | multiply by 0.07000 | ± 2000 dps |
The linearity, offset and noise level of the sensor is described in the device datasheet; some degree of calibration may be required for precision measurements.
Magnetometer
The magnetometer sensor output is expressed as three signed 16 bit integers in the order x, y, z. The orientation of the x and y axis are aligned to the accelerometer and gyroscope.
NOTE: The z axis is in the opposite direction to the other two sensors
It is simple to correct this is software by changing the sign of the z axis output i.e. z = -z.
The output of the magnetometer sensor is the measured magnetic field in the direction of the axis in approximately 0.1 μT steps (1 mGs, milli-gauss) and the range of the sensor is +/- 20,000 (2 mT or 0.2 Gs). The scaling factor will vary between devices (scaling error), the magnetometer will be influenced by magnetised nearby materials (offset error) and the earth’s magnetic field varies widely around the earths surface. For this reason, most magnetometer calculations that determine heading (compass calculations) do not rely on the absolute field strength other than to determine if the sensor is being interfered with. For details on implementing a compass functionality the user should investigate the many options available such as this application note which uses the same sensor pair (both magnetometer and accelerometer).
Control Interface
After the device has been charged and disconnected from the USB cable for the first time it will quickly become discoverable as a Bluetooth device called WAX9-XXXX where XXXX is the device identifier (device id). If the device id is left as its default setting then the XXXX becomes the last 4 hexadecimal characters of the Bluetooth media access control (MAC) address.
NOTE: If required, the default pairing code for standard Bluetooth pairing will be “0000”.
For low energy (LE) connections, the device is in 'Just works' configuration and will accept one connection at a time. Simultaneous standard Bluetooth and LE connections are not permitted.
RFCOMM Control Interface
Control of the device can be performed over an RFCOMM channel which can be established by pairing to the device and opening a port. Each operating system (OS) offers many different options for using communication COM ports, however, it is recommended to initially connect to the device using a terminal program such as hyperterminal to familiarise the user with the interface (other options for terminals). Some of the OS’s application programmers interfaces (APIs) used to control COM ports may not function as expected using RFCOMM. The terminal application may ask for baud settings, these are not applicable to RFCOMM ports and the default settings should be used (usually 8 bit, No parity, 1 stop bit or abbreviated “8N1”). Open connected to the device, type a command such as settings CR; where CR is the carriage return character, usually the return key. The device will respond in plain text to display its current settings. sample CR will display the sampled sensor data in the format described in the data output section.
Bluetooth Low Energy Attribute Control
The Bluetooth low energy (LE) mode of the device shares some of the characteristics of the standard RFCOMM interface by exposing a serial communication channel for commands and responses. The LE control mode also allows direct manipulation of the device settings and lacks the ability to stream raw text data (due to the reduced bandwidth). The profile of the device can be freely explored using an LE attribute explorer on a LE enabled device. Skip to the LE communication section to get started quickly with the LE modes of operation.
Serial Data Output
The device has three serial data output modes explained in this section. The streaming modes use a transmit threshold option to reduce channel congestion and interference resulting in less dropped packets; it is set by the threshold command (e.g. threshold=128 CR LF ). The threshold stops the device transmitting until either the data stored in memory is more than 1 second old or there is at least threshold bytes to send. This results in fewer transmitted radio packets at the expense of longer data latency; it is disabled by default (zero).
Single Sample
This is the response to the sample command and is always in text mode including a comma separated value (CSV) list of the variable positions. This mode is intended for sparsely point sampled data or debugging.
NOTE:This mode is also available using the LE serial port connection.
e.g. DATA: N,Ax,Ay,Az,Gx,Gy,Gz,Mx,My,-Mz,Batmv,Temp0.1C,PresPa,Ia CR LF 0,101,25,4050,12,-61,37,-2078,187,3698,3890,205,100257,0 CR LF
Text Stream
The text stream data output is in the same format as the single sample (without variable position list) and is in plain text (UTF-8). The data rate is set by the RATEX variable in samples per second (default 50 Hz). The sample number (first variable in the list) should be used to identify if samples are missing (e.g. due to the device going out of range briefly). The default behaviour (DATAMODE variable is zero) is to only transmit the extended data (battery, temperature, pressure and inactivity count) when it is sampled; approximately twice per second.
NOTE:Text streams are not available for LE connections.
e.g. Normal: 0,101,-25,4050,12,-61,37,-2078,187,3698 CR LF Long: 0,101,-25,4050,12,-61,37,-2078,187,3698,3890,205,100257,0 CR LF
Binary Stream
This is the recommended operating mode for high performance systems. The sensor data is transmitted in raw binary using slip encoding (RFC 1055), this allows the framing of the data to be extracted. Binary stream mode offers greatly reduced channel usage and hence higher sample rates. LE connections use a different binary format as described in the LE section of this document. The binary format is:
| Byte * | Value hex** | Note |
|---|---|---|
| 0 | 0xC0 | SLIP END |
| 1 | 0x39 | Ascii ‘9’ |
| 2 | 0x01 or 0x02 | Packet format |
| 3+4 | 0xXXXX | Sample number |
| 5+6+7+8 | 0xXXXXXXXX | Sample timestamp*** |
| 9+10 | 0xXXXX | Accelerometer x values (as 16 bit signed integer) |
| 11+12 | 0xXXXX | Accelerometer y values |
| 13+14 | 0xXXXX | Accelerometer z values |
| 15+16 | 0xXXXX | Gyroscope x values (as 16 bit signed integers) |
| 17+18 | 0xXXXX | Gyroscope y values |
| 19+20 | 0xXXXX | Gyroscope z values |
| 21+22 | 0xXXXX | Magnetometer x values (as 16 bit signed integers) |
| 23+24 | 0xXXXX | Magnetometer y values |
| 25+26 | 0xXXXX | Magnetometer z values |
| 27+28**** | 0xXXXX | Battery voltage in millivolts |
| 29+30**** | 0xXXXX | Signed temperature in 0.1 ̊C steps |
| 31+32+33+34**** | 0xXXXXXXXX | Unsigned barometric pressure in pascals (Pa) |
| 27 or 35 | 0xC0 | SLIP END |
* Multi byte fields are ordered little-endian (LE) or least significant byte first.
** Bytes equal to slip codes are replaced with the RFC 1055 escape sequence.
*** Timestamps are in 1/65536 of a second.
**** For packet formats of 0x02 only, otherwise absent.
Serial Commands Summary
This section covers the serial commands that can be used to configure and customise the device. All serial commands are text based, case insensitive and terminated with a CR symbol. The user may also send a LF character which will be ignored. Some commands using an RFCOMM connection can be concatenated using the ‘|’ symbol (0x7C) to replace the CR in this case the maximum command length is 64 characters. For LE connections, concatenation is not possible, the command length must be 20 characters maximum and the CR does not have to be added. However, LE connection may directly read and write the settings controlled by these serial commands as described in the LE section of this document. Some commands may cause the device to lose communication with the host computer and stall the COM port, if the device becomes unresponsive or un-connectable there are four options:
-
The clear CR command restores default settings, the reset CR command will reset the device and load these settings.
-
Connecting the device to a charger or host using the USB will reset the device and allow reconnection.
-
Boot loading the firmware to the device again will factory reset the device.
-
If the device will not reset to bootloader, leave it disconnected. An internal timeout will reset it after approximately one minute.
Terminating Commands
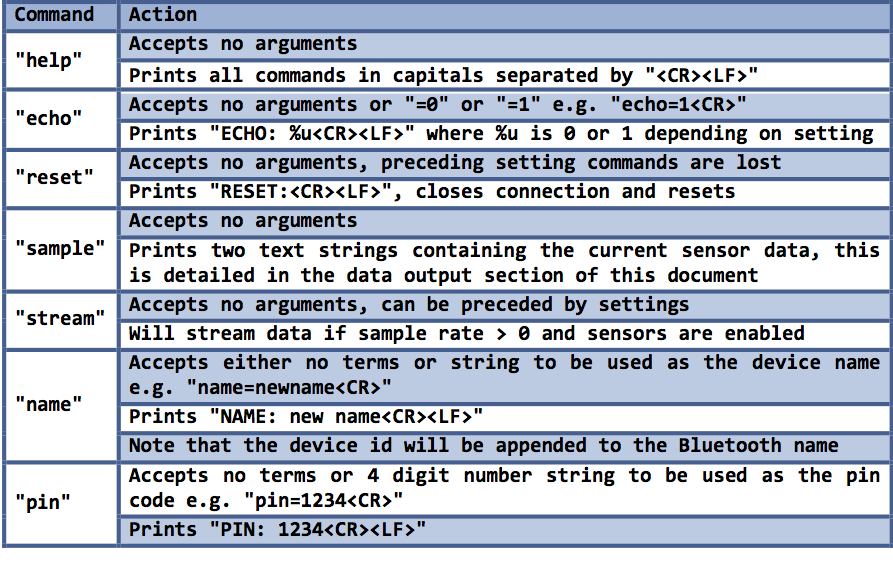
These commands can not be followed by additional commands. It is assumed that the text is followed by a CR after the arguments, the device will immediately execute the command(s).
Group-able Commands
These commands may be concatenated into a single command up to 64 characters long total.
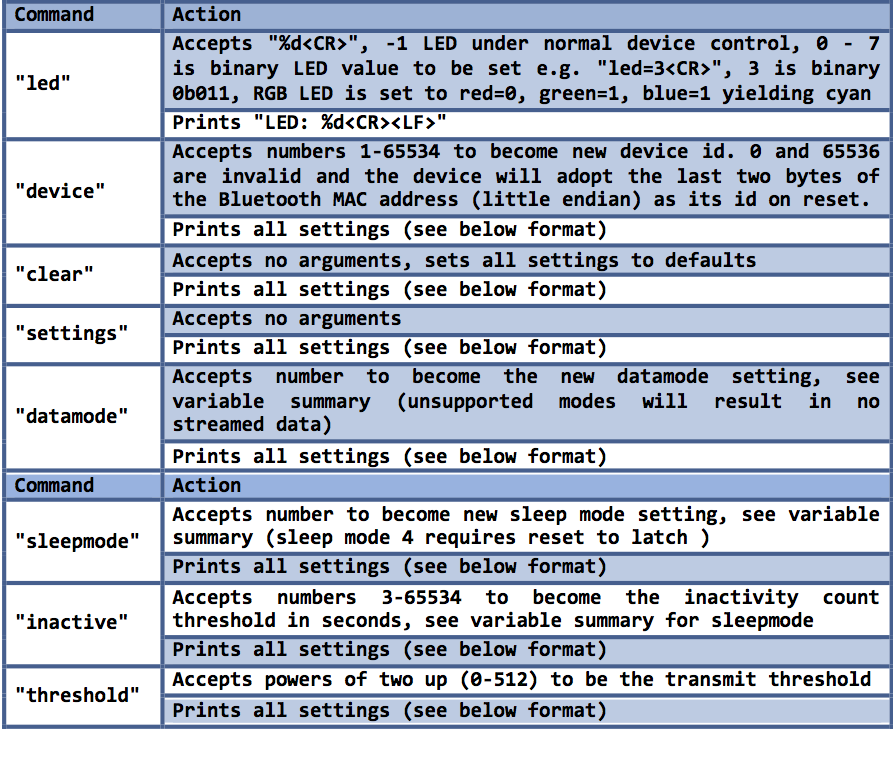
NOTE: After a sleepmode:4 CR command, a reset CR command is also necessary to get the device to enter hibernate.
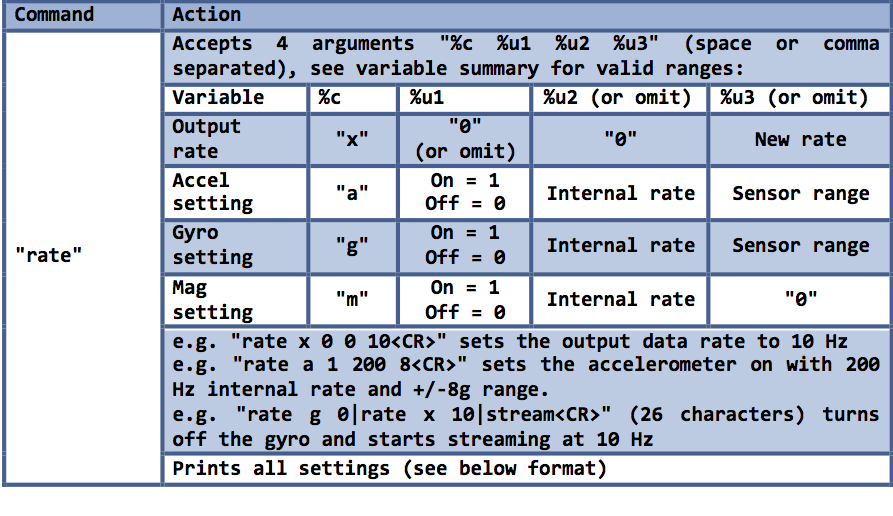
All Setting Output Print Format
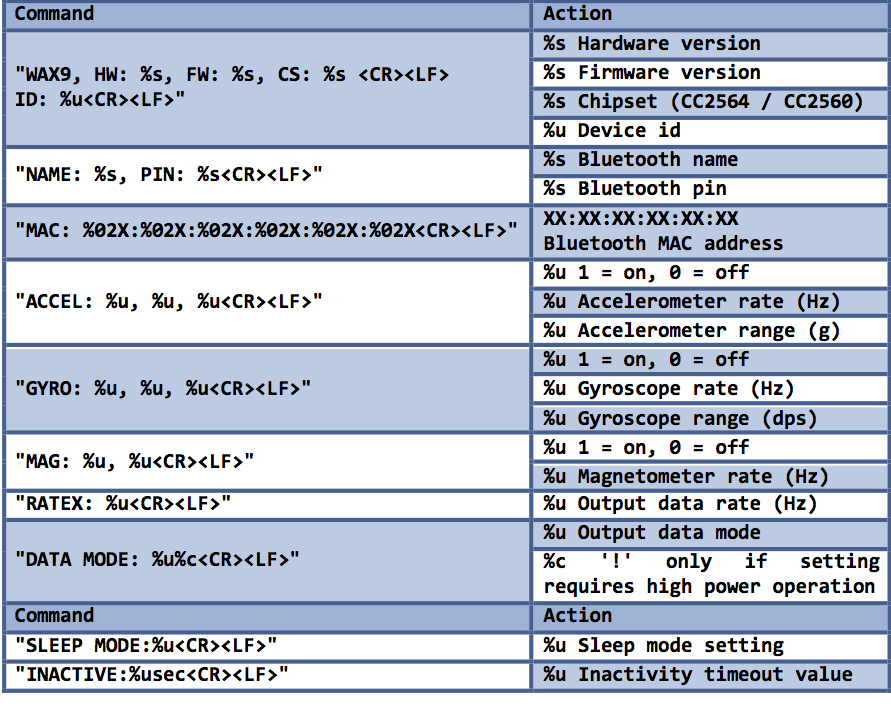
Sensor Settings
The sensors on the WAX9 are listed in the device datasheet, they are all digital sensors with their own independent sample clocks. This makes synchronising the sample point across all sensors impossible and can only be solved by two solutions:
-
Allow each sensor to have its own stream and send packeted data over the port separately. This makes synchronisation difficult since the sensors will have slightly different sample rates (e.g. 101 Hz and 98 Hz) resulting in changes of packet ordering on the channel. Secondly, if the samples are sent sample by sample, each packet must also have a timestamp and identifier resulting in a large additional data flow and potential channel contention. Thirdly, interpolation must be used on the receiver side to re-synchronise the streams before processing, thus adding latency and processing time.
-
The sensors can be configured to oversample at a higher rate than the sample clock and are then re-sampled synchronously using a precision clock. This offers very accurate sample rates, minimal signal latency and synchronous sensor data; This is the method employed by the WAX9. The disadvantage is that a timing error up to the sensor internal sample interval may be present. E.g. If the accelerometer and gyroscope have internal sample rates set to 200 Hz and the output data rate is 100 Hz, a sample may contain accelerometer and gyroscope sample up to 5 ms (1/200 Hz) old or up to 5 ms apart; For some applications, it is necessary to use high oversample ratios to remove this error at the expense of slightly shorter battery life. For some applications, an under sample scheme can be employed to reduce the data flow from that sensor (e.g. magnetometer defaults to 10Hz rate).
The sensors each have their own independent internal sample rates because of the sampling scheme described above. The sampling rates may be independent of the output data rate. This table summarises the settings available for each sensor. Using variables outside this table will result in the default value being chosen.
| Variable | Values | Effect |
|---|---|---|
| Accelerometer on | 1 or 0 | On or Off resp |
| Accelerometer rate | 12 50 100 200 400 800 | Internal rate Hz |
| Accelerometer range | 2 4 8 | Range in +/-g |
| Gyroscope on | 1 or 0 | On or Off resp |
| Gyroscope rate | 100 200 400 800 | Internal rate Hz |
| Gyroscope range | 250 500 2000 | Range in dps |
| Magnetometer on | 1 or 0 | On or Off resp |
| Magnetometer rate | 5 10 20 40 80 | Internal rate Hz |
Other Variables
Data Mode Setting
The data mode setting determines the format of the serial data sent over the RFCOMM channel. Sensor data is sent as text mode or slip-encoded binary. LE connections use a different transmission format irrespective of the data mode. The following summarises the currently supported sub-modes:
| Value of datamode | Data output format* |
|---|---|
| 0 | Ascii mode with batt temp pressure inactivity transmitted as they are sampled (~1Hz) |
| 128 | Ascii mode with batt temp pressure inactivity transmitted every packet |
| 1 | Binary mode with ~1Hz batt temp pressure inactivity update. Packet types 1 and 2 |
| 129 | Binary mode with continuous batt temp pressure inactivity update. Packet type 2 only |
* Not applicable to LE connections
Sleep Mode Setting
The sleep modes of the device allow significant power saving when the device is not being used yielding longer battery life.
| Value of sleepmode | Behaviour |
|---|---|
| 0 | Highest power. Allows slightly faster re-connects and can be powered over USB instead of re-setting (once) |
| 1 | Normal mode. Never hibernates. Low power discoverable |
| 2 | Hibernates after inactivity timer reaches setting (inactive value) without movement being detected |
| 3 | Hibernates after inactivity timer reaches setting (inactive value) without orientation changing |
| 4 | Hibernate upon disconnect until next USB connect then change to sleep mode 1. This is shipping mode also |
NOTE: After a sleepmode:4 CR command, a reset CR command is also necessary to get the device to enter hibernate.
Low Energy Connections
The WAX9 can be accessed using the Bluetooth low energy attribute protocol. This section summarises the attribute profile and its various features. The attribute protocol is briefly described here.
The Attribute Protocol
In its simplest form, the attribute protocol describes a set of locations (handles) and associates descriptions ( < Characteristic User Description> ), characteristics (< Characteristic>) and client settings (< Client Characteristic Configuration>). These are clustered into services (< Primary Service>,
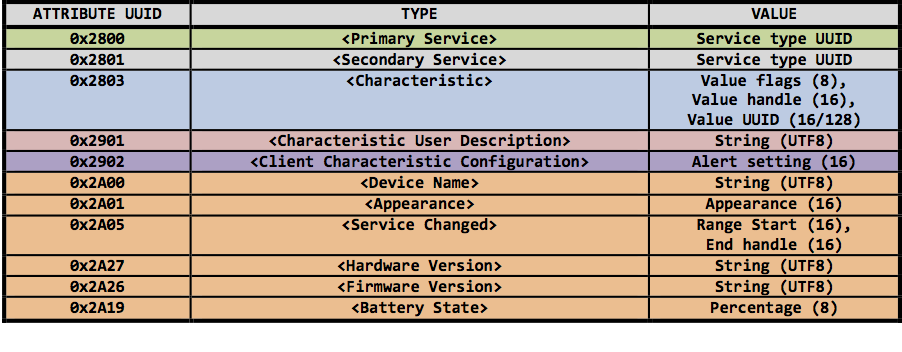

* nRF UART APP for Android and iOS
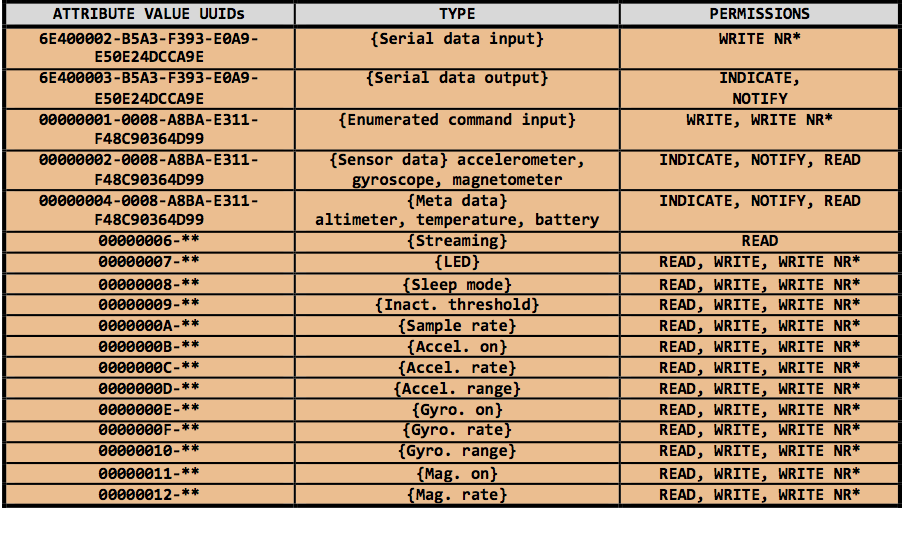
*WRITE NR is write with no response, also known as write command **The remaining UUID is truncated for readability - 0008-A8BA-E311-F48C90364D99
The WAX9 Attribute Profile
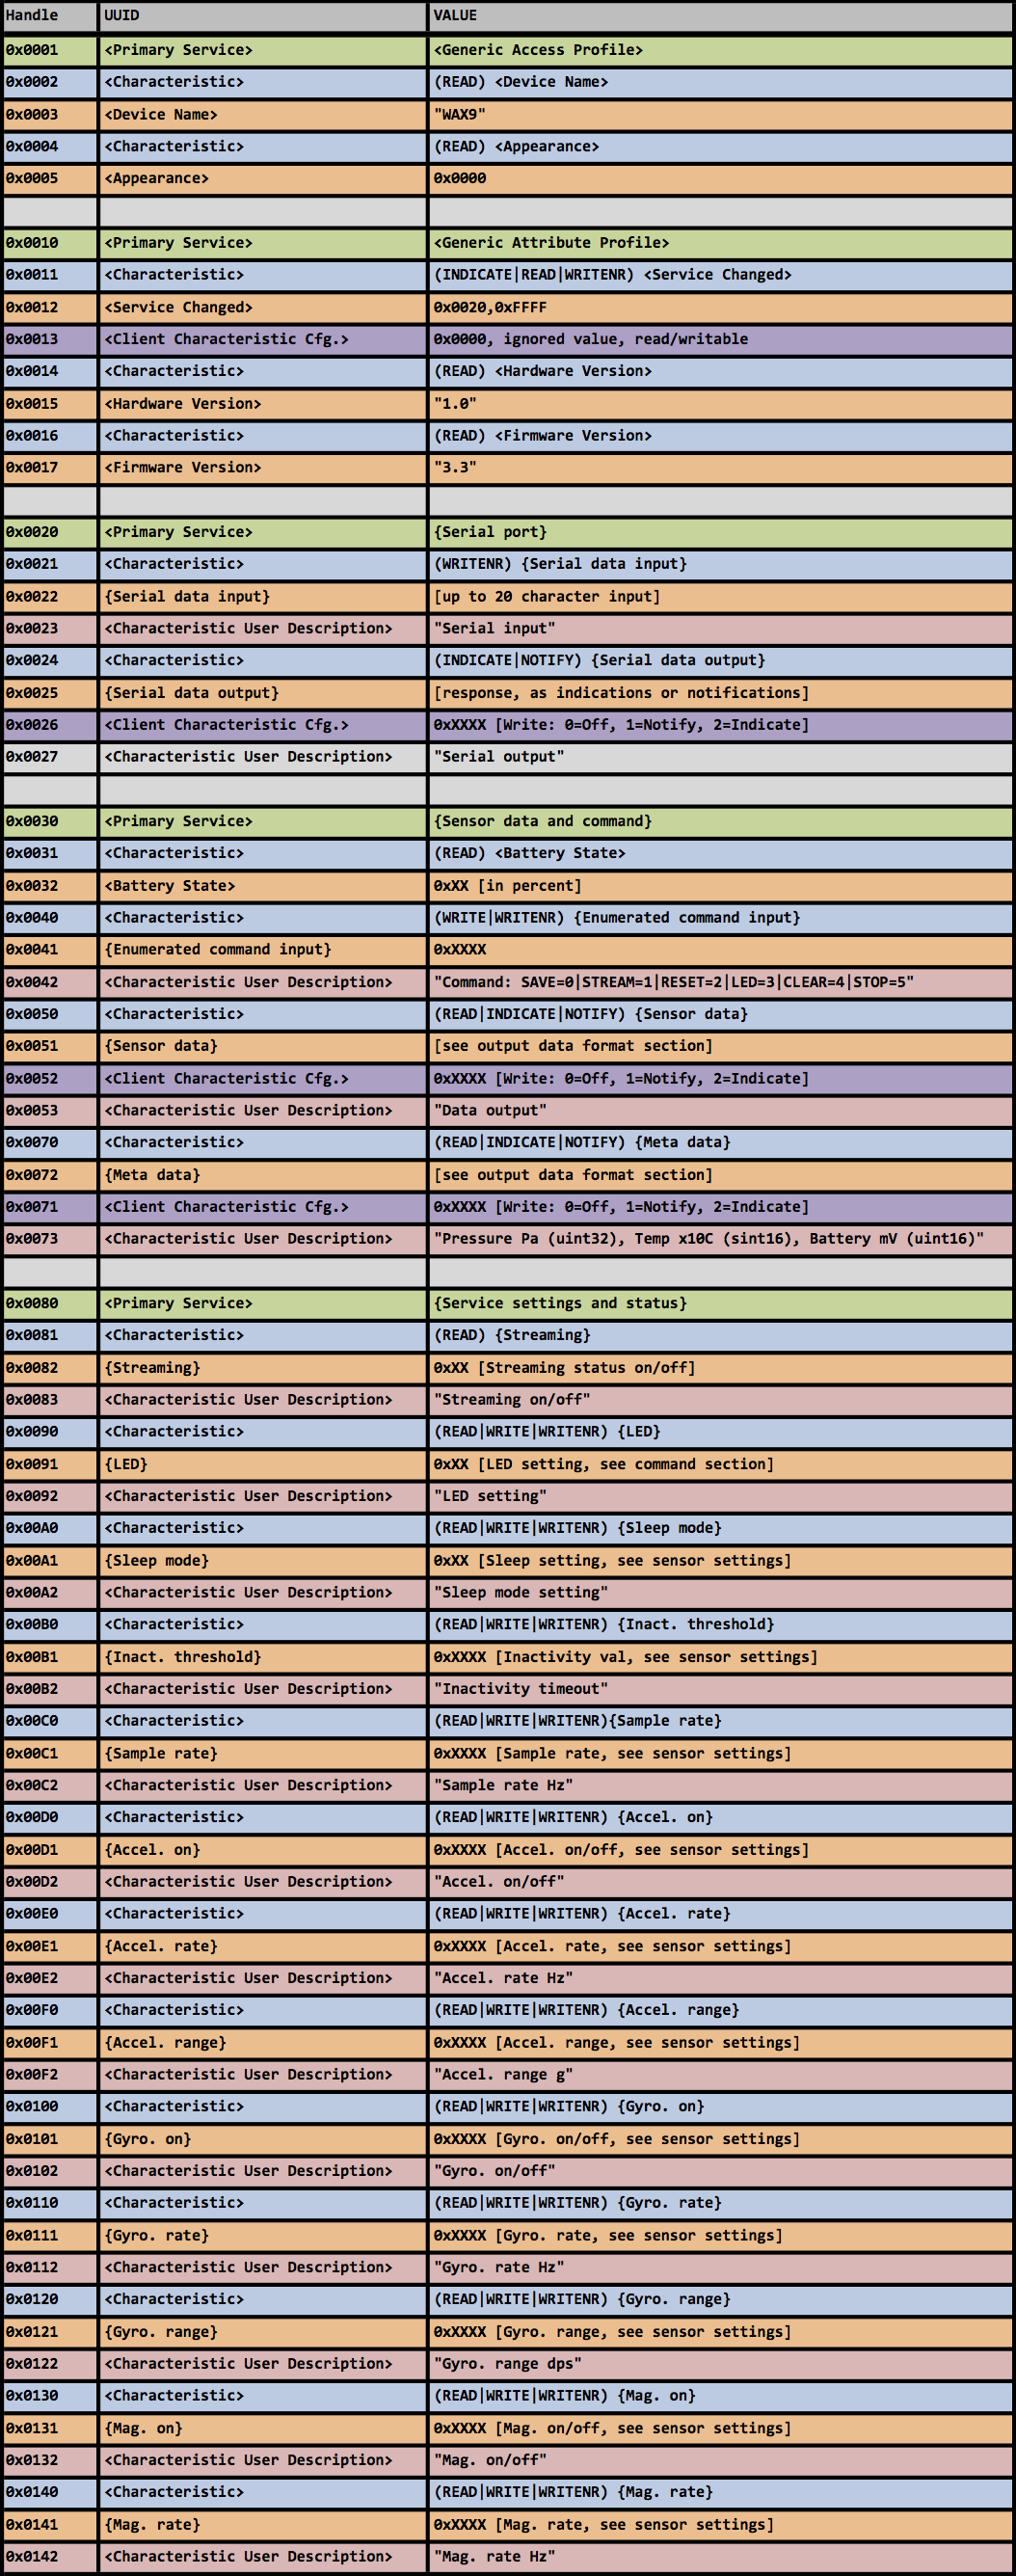
This section lists the attribute profile ordering with the handle numbers used. However, most systems have an API to explore devices and discover services. The handle numbers are liable to change in future revisions of the firmware, the user should aim to use only the UUID values.
Attribute Protocol Communication
There are several ways of obtaining data from and controlling the WAX9 using the attribute protocol. This can be simply reading or writing the values directly or using notifications and indications. Reading is always a request-response transaction whereas writing can be preformed without a write confirmation (WRITENR also know as COMMAND transactions). Reading and writing of attributes allows variables much longer than the maximum data unit size to be transferred reliably at the expense of longer transaction times. The preferable method of streaming the sensor data is to use notifications or indications initiated by the WAX9. Notifications are used for guaranteed data flow and require a response, furthermore, there can only be one pending notification at a time. The result is that notifications are not the preferred streaming method unless low sample rates and guaranteed throughput is required. If a sample time elapses while waiting for the indication response then the pending sample is lost. Notifications are better for higher data rates as they require no response or acknowledgement and can be sent at any time. The problem with notifications and indications is that the maximum data packet size is restricted; the Bluetooth LE specification only guarantees a 20 byte payload to be supported.
The serial port service uses WRITENR packets to the serial input (WAX9) and NOTICIFATIONS for the serial output (from the WAX9). To receive these notifications the user should write the value 0x0001 to the < Client Characteristic Configuration> associated with the {Serial data output}, handle 0x0026. Notifications can not be polled for and this value must be set to receive notifications of serial messages. For indications the value 0x0002 should be written and to disable the serial output a value of 0x0000 is used. A value of 0x0003 enables notifications and indications, however, in the WAX9 implementation the indication flag has precedence. It should be noted that the serial port service is not controlled, specified or recommended by the Bluetooth SIG and is purely to facilitate transiting from RFCOMM to LE modes. The UUID values used by Nordic Semiconductor in their LE UART program were used to allow compatibility with their mobile phone applications.
The same < Client Characteristic Configuration> values are associated with the {Sensor data} and {Meta data} attributes. Writing values of 0x0001 and 0x0002 will enable notifications and indications respectively in the same fashion as the serial port service. It is suggested that notifications be used for sensor data and indications or notifications be used for meta data depending on its importance. In either mode, the same data format is always transmitted for each handle and framing is unimportant due to the fixed packet boundaries.
Device Control
The user will likely control the device in LE mode using the dedicated variable mappings provided in the profile. These settings are identical to those set by the serial commands as summarised in the sensor settings section. The majority of the settings (excluding inactivity timeout and LED) will not take effect until the device receives a command to the {Enumerated command input} attribute. This attribute should be written with a uint16 value as enumerated in the following table; It is write only.
| Command number | Behaviour |
|---|---|
| 0x0000 | Save: Latches current settings. Useful for new sleep mode settings. Will stop streaming and sensors are turned off |
| 0x0001 | Stream: Latches settings. Powers on sensors and begins streaming |
| 0x0002 | Reset: Device will close Bluetooth connection and execute a reset. Any new settings are lost |
| 0x0003 | LED: The current LED override setting is restored to device control (-1). Will stop streaming and sensors are turned off |
| 0x0004 | Clear: The current settings are replaced with the defaults and saved. Will stop streaming and sensors are turned off |
| 0x0005 | Stop: Latches current settings. Useful for new sleep mode settings. Will stop streaming and sensors are turned off |
| 0x0006 | Pause: The device stops streaming. Sensors remain on and sampling continues* |
| 0x0007 | Play: Valid only after pause. Resumes streaming* |
* Sample number continues to increment, new settings are not latched
Data Output Format
The following table shows the 20 byte data format for sensor data indications and notifications.
| Byte * | Value hex | Note |
|---|---|---|
| 0+1 | 0xXXXX | Sample number uint16 |
| 2+3, 4+5, 6+7 | 0xXXXX, 0xXXXX, 0xXXXX | Accelerometer values. 16 bit signed integers. Order x,y,z |
| 8+9, 10+11, 12+13 | 0xXXXX, 0xXXXX, 0xXXXX | Gyroscope values. 16 bit signed integers. Order x,y,z |
| 14+15, 16+17, 18+19 | 0xXXXX, 0xXXXX, 0xXXXX | Magnetometer values. 16 bit signed integers. order x,y, -z |
The following table shows the 8 byte data format for indications and notifications of the meta data (pressure, temperature and battery).
| Byte * | Value hex | Note |
|---|---|---|
| 0+1+2+3 | 0xXXXXXXXX | Pressure Pascal's (pa) uint32 |
| 4+5 | 0xXXXX | Temperature °C x10 signed int16 |
| 6+7 | 0xXXXX | Battery mill volts uint16 |
* All values are little endian i.e. Battery ..., 0x40, 0x10 is 0x1040 or 4.160 V
Channel Contention Issues
It is possible to set very high packet rates to the client by setting high sample rates and this may create channel contention. Typical LE baseband controllers have a maximum throughput of ~4 kB/s which is a 200 Hz notification rate. If the channel becomes blocked it may not be possible to send a stop command or clear the notification flag and in this instance it becomes necessary to cycle the device connection to restore control.